


Updated: February 20th, 2024
Being able to read drum sheet music has been one of the greatest assets in my drumming career so far! I know that not all the drummers are interested in it but for my own professionalism, I prefrred to learn it.
Seriously, it doesn’t matter whether I walked into the rehearsal room of a new band or joined an orchestra. Once they saw that I could sit down in front of a piece of paper (and a drum set of course) and just start playing with them – they were impressed.
And I’m not saying that in order to brag. Rather, I want to motivate you to learn to read drum sheet music too. For drummers who can’t are a dime and a dozen. And once you can, this will make it so much easier for you to be picked by a band – or whatever formation you want to join – instead of begging to be considered. Because knowing how to read drum sheet music will help you to be differentiated from the others.
So without further ado, let’s jump in: I’ll take you from absolute zero to reading a fairly complex four-bar phrase in the first half of the article. It’s not difficult but somewhat technical – so please bear with me.There are also some books that can help you with drum sheets. I can recommend you to have a look at Master Studies.
And because you can impress even more (or earn money) by being able to write drum sheet music yourself – I’ll throw in some tips on that in the second half of the article – including my favorite free drum sheet music software.
Reading Drum Sheet Music
All you need to know about drum sheet music basics.
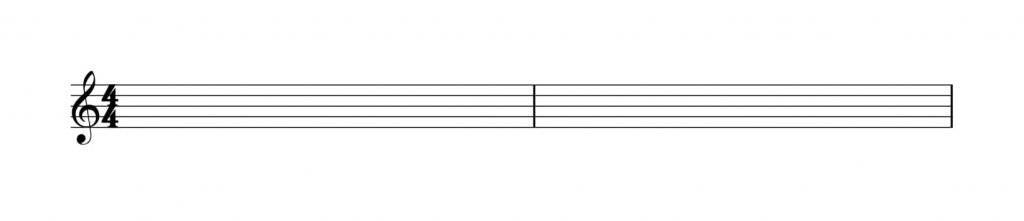
The Staff
It is the visual representation of the played music. Think of drum sheet music as a set of 2 layers of symbols. And the first layer, the groundwork, is the musical staff:
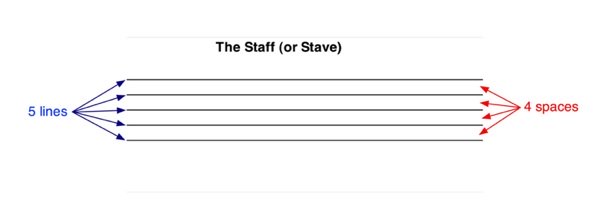

The only thing you need to know here is that the staff is made up of five lines on which our notes will be placed. And these will tell us whether to hit a cymbal or a certain drum…
Note Placement or “the Drum Key”
Let’s first look at where each drum or cymbal sits on the staff.
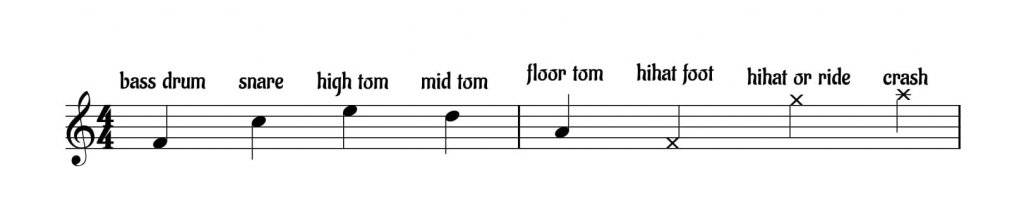

There are various versions of this so-called “drum key”, but once you get the concept you can read ’em all. So please notice that:
- The drums are signified by “proper” notes while the cymbals are signified by little Xs
- The hi-hat and the ride cymbal sit on the same line. Always play the hi-hat unless stated otherwise.
The easiest way to remember/make sense of these positions is to recognize that the height of a note in the 5-line system approximates to where you play the associated drum/cymbal.

For instance: You play the bass drum and hi-hat foot with – guess what- your feet so they are furthest down in the staff. By contrast, the cymbals are situated up above your drums (and much higher than your pedals), so they are placed highest in the staff.
So now you know which cymbal or drum a certain piece of sheet music tells you to play. But how do you know when to play it?
Time Signature
Here is how to read drum notes. When to play a note is where the second layer of symbols comes in. The most important symbol of this layer is this:
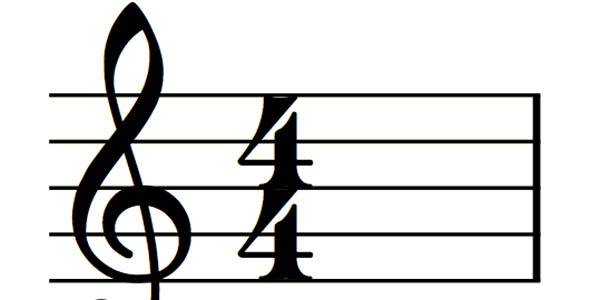

It will be placed at the very beginning of each piece of drum sheet music and you can safely ignore the number at the bottom for now.
Rather, focus on the number at the top which tells you how many notes can fit into a bar (i.e. a part of your sheet; more on that in a second…).
So? 4 notes, right?
Jep. But what about this “bar” thing?
Bars
Well, 4 notes for an entire piece of music wouldn’t be cool. It would give about 0.1 to 4 seconds of music (if you made it slow).
But fitting in, say, 400 instead of 4 notes wouldn’t be helpful either, because unless you’re an advanced musician, you need to count notes to be able to follow along. And you’d certainly lose track when trying to count to 400 and play drums at the same time.
That’s why sheet music writers came up with the idea of bars (or “measures”) which are signified by a vertical line like this:

This way you can fit 400 notes into a piece of sheet music – giving you minutes and minutes of music – while only having to count to 4, because now the sequence of 400 notes would be broken into 100 bars containing 4 notes each.
Drum Music Notes
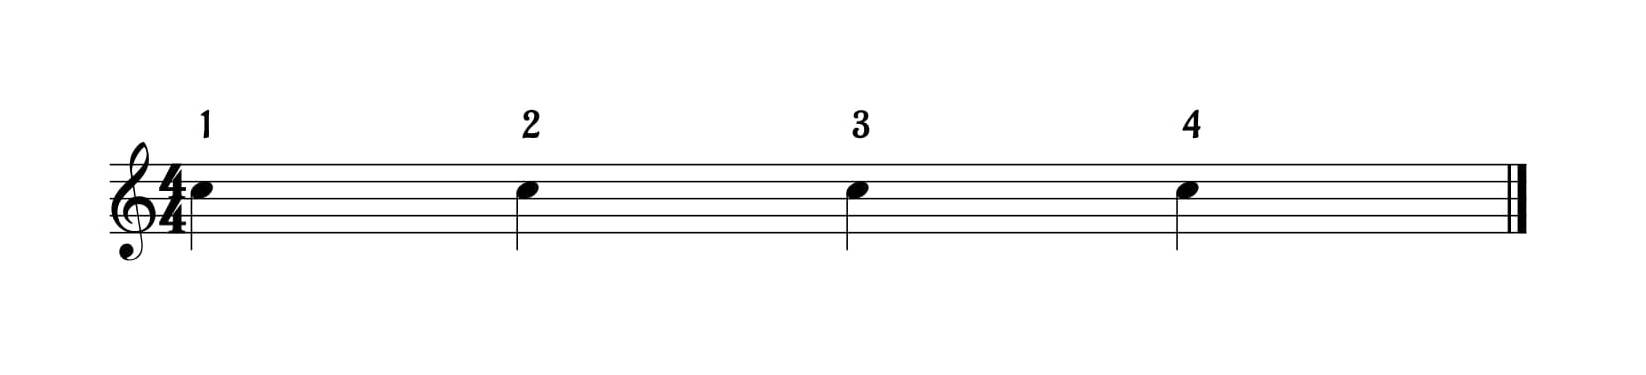
So you have your piece of drum sheet music in front of you and you’re counting “1, 2, 3, 4”? Cool!
But what to play while counting?
This is what notes tell you.
The most important ones are listed below and in order to read drum sheet music you need to be able to distinguish them by the way they appear in the “note” section (circle filled or unfilled; with or without vertical line; with or without tail).
But: don’t try to learn them by heart now; rather, come back later once you encounter problems in your actual reading of drum sheet music.
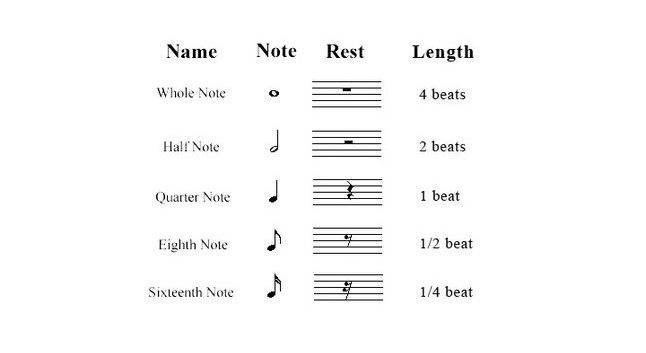

For now, let’s focus on the “length” column and imagine we were counting “1, 2, 3, 4” again. You’d then count and hit your drums as follows:
- Playing a “whole” note, you’d hit a drum (or a cymbal) on count “1” and then wait for 3 more beats (i.e. the “2”, “3” and “4”) so you’d have covered four beats in total.
- Playing a “half” note, you’d hit on count “1”, and wait out count “2”. If there was another “half” note after that, you’d hit again on “3” and wait out “4”.
“Whole” and “half” notes are good for understanding the concept, but they actually almost never appear in drumming. So let’s look go over the remaining three note values one by one:
Quarter Notes
A quarter note takes up one beat, so you’d hit on count “1” and be done with it by the time you count “2”. Let’s assume for a second that what follows would be another quarter note, and another, and another. These 4 quarter notes would fill up a whole bar and be counted as follows:

“1, 2, 3, 4” and a hit on each of those counts – that’s all there is to it.
Eighth Notes
An eighth note, by contrast, only lasts half a beat, so half of each of your counts. You’d hit on “1” and the eighth note would end exactly mid-way between counts “1” and “2”.
But how to determine the exact middle between two counts? Well, by way of a more finely-grained counting system.
Instead of “1, 2, 3, 4”, we’d now count “1, and, 2, and, 3, and, 4, and”. And hitting on count “1”, we’d now that the eighth lasts exactly until our first “and”.
So let’s again assume that a whole bar would be filled with eighth notes. This would give us a sequence of 8 eighth notes and look like this:
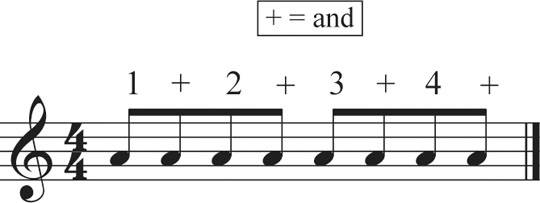

How do you play that? Right: you hit on counts “1, and, 2, and, 3, and, 4, and”
Sixteenth Notes
Ready for the finale?
Sixteenth notes are shorter yet. They only last for one-fourth of a beat. So we need a yet more finely-grained counting system:
“1, e, and, a, 2, e, and, a, 3, e, and, a, 4, e, and, a”. Hitting on count “1”, you’d know that one-sixteenth note would exactly last until count “e”.
And how many sixteenth notes will fill up a whole bar?
16! In a piece of drum sheet music, this would look and be counted this way:


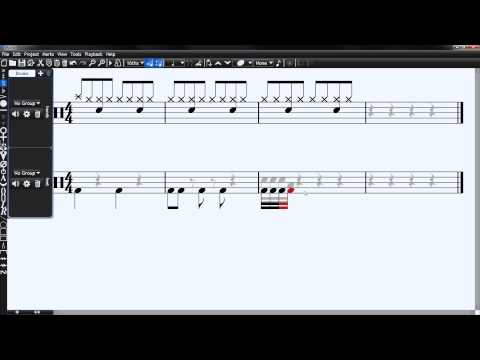
The Basic Rock Beat
The final step is to take the information about note values and combine it with your knowledge about note placement from the beginning of the article (that tells you which drum / cymbal to play).
You need both to decipher a rock groove like the following (we will break it down together in a second):
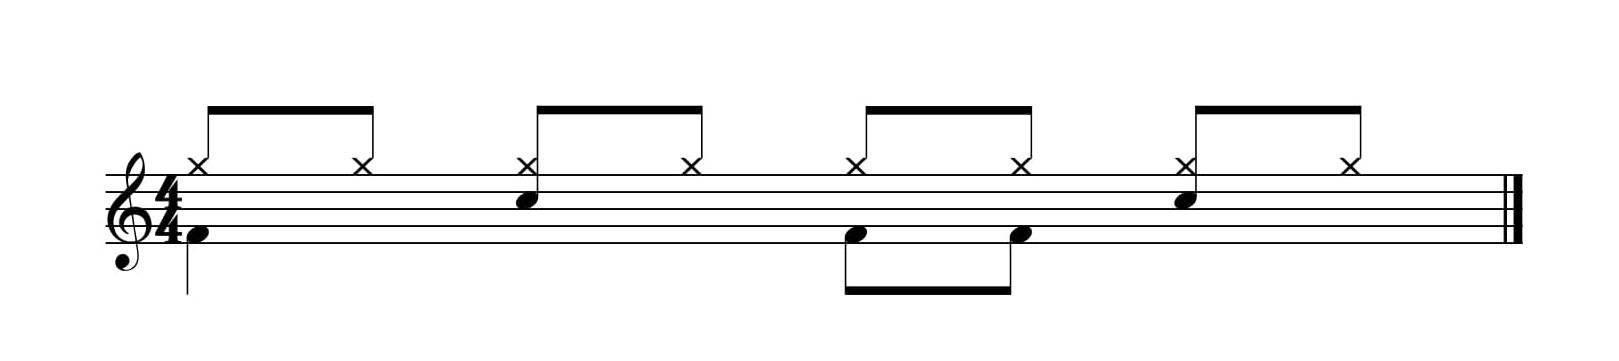

The first thing to do is to isolate the different drum / cymbal parts. In this case, there is:
- one (the upper) for to be played on the hi-hat
- one (in the middle) to be played on the snare drum
- and one (down below) to be played on the bass drum.
Now let’s focus on the hi-hat part and its note values to find out how we’d have to count and play.
In this case, the hi-hat is notated in eighth notes so you’d have to count and play in “1, and, 2, and, 3, and, 4, and”.
Initially, it can help a lot to write out how to count the groove, which would look like this:


Now that you can count and play the hi-hat you’d move on to the the second drum part in the middle (for the snare drum).
And since we’ve already written out the counting pattern, we immediately see that the snare is played two times in this bar: once on count “2” and once on count “4”. Easy enough right?
Moving on to the bass drum part at the bottom, it’s equally simple. You’d have to hit the kick pedal on counts “1”, “3” as well as on the “and” following “3”.
Put this all together and you get this groove (jump to 2:43 of the video):

And the cool thing is: once you’ve understood the system so far, you’ll be to figure out how to read another rock groove on this planet too.
The icing on the cake is now to learn how to read a drum fill. This will really spice up your drumming:
A Basic Drum Fill
See for yourself if you can already bring a bit of order into this accumulation of dots and lines:


If you’ve figured out that this fill-in consists of 16th notes you’re exactly right. And we’ve got sixteen of those – a whole a bar, that is.
So you’d count this fill as: “1 e and a 2 e and a 3 e and a 4 e and a”. Again, it’s helpful to write this out:
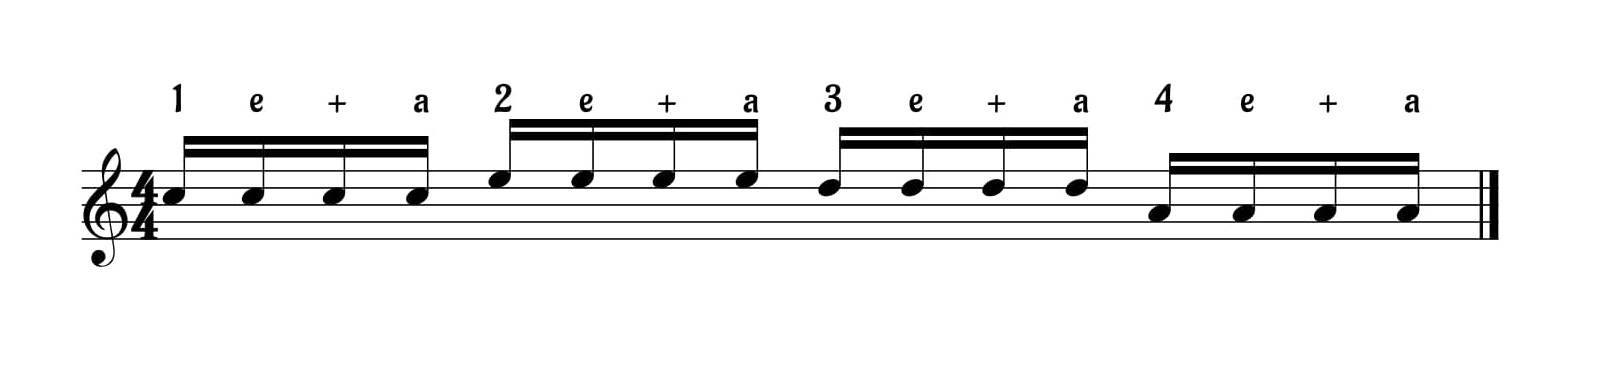

The procedure is exactly like before: isolate the parts being played on different drums – in this case, 4 – and realize that each of those parts consists of 4 hits on a certain drum:
- Four hits on the snare drum on counts “1 e and a”
- Four hits on the high tom on counts “2 e and a”
- Four hits on the middle tom on counts “3 e and a”
- and four hits on the low tom on counts “4 e and a”
I can’t help but repeat myself: “Easy enough, right?” 🙂
Here is a video of the fill being played (jump to 4:02 of the video).
Final Exercise
Congratulations – you know the rules of the game of reading drum sheet music. But I want to give you one more opportunity for guided practice. It looks like this:
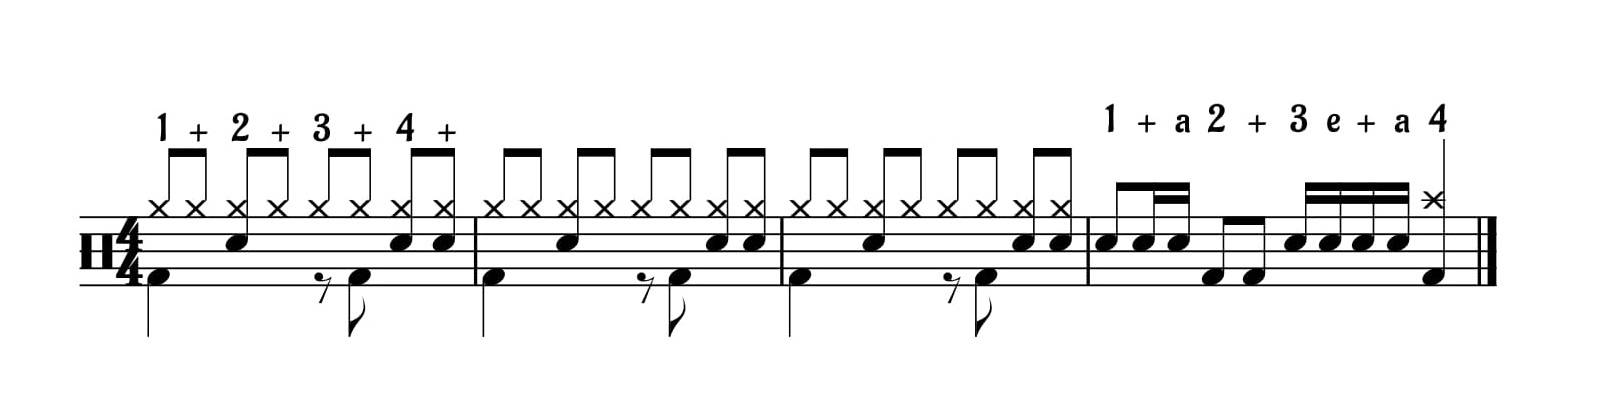

This four-bar phrase might seem intimidating, when actually it isn’t. Because looking closer, you’ll realize that the first 3 bars are exactly the same.
So figure out 25% and be able to play 75%. That’s a pretty sweet deal – and it’s actually very common in drumming. I estimate that on average 50-75% of the bars of any drum sheet consist of the same pattern played over and over again.
But back to our four bar phrase and the first three look-alike bars. Let’s zoom in to wrap our heads around it:


You do this – of course – by focusing on the hi-hat part at the top which is – yet again – counted and played in eighth.
The second part, for the snare drum, is played – yet again – on counts “2” and “4” and the new thing here is an additional hit on the “and” after count “4”.
The bass drum part (at the bottom) might seem strange to you and that is because it contains a “rest” – the small thing on count 3 – which we haven’t covered yet.
Now, rests are the opposite of notes. and, as the name suggests, rests tell you when decidedly not to play.
Focusing on the bass drum part, there are lots of moments in the bar where you don’t play, so actually the author could have put in many more rests. For some reason he didn’t, but that need not concern us.
The only thing that you should note is that the symbol on count “3” tells you not to play anything, so you’re left with 2 hits on the bass drum in this bar: on count “1” and count “and” after “3”.
Play this groove three times and you arrive at the last bar in the four-bar phrase, which contains a fill-in as a kind of finale. Let’s zoom in on it:


So what do you do
Right: isolate the drum parts on the various drums:
- Counts “1” & “and” & “a” on the snare drum
- Counts “2” & “and” on the bass drum
- Counts “3 e and a” on the snare again
- And now something a little new: two parts played simultaneously on count “4” – the bass drum and the crash cymbal.
And there you have it. In a few dozen minutes you’ve gone from zero to reading a complex four-bar phrase.
So imagine what you could do with a little practice like this every now and then? and where you can use drum sheet? check these pages.
Writing Drum Sheet Music
I promised to also throw in some tips on writing drum sheet music.
This comes in especially handy when you join an existing band and are forced to learn dozens of songs that are new for you in a short amount of time. For chances are you won’t be able to learn them all by heart until the first rehearsal.
So I always write out drum charts for the songs and bring them along for the first few rehearsals.This way, I don’t have to worry about what to play and can focus on playing it well
And since you already know how to read drum sheet music you implicitly know how to write it too. So:
I won’t bore you with the details and instead show you my favorite tool for writing drum sheet music:
Notation Software
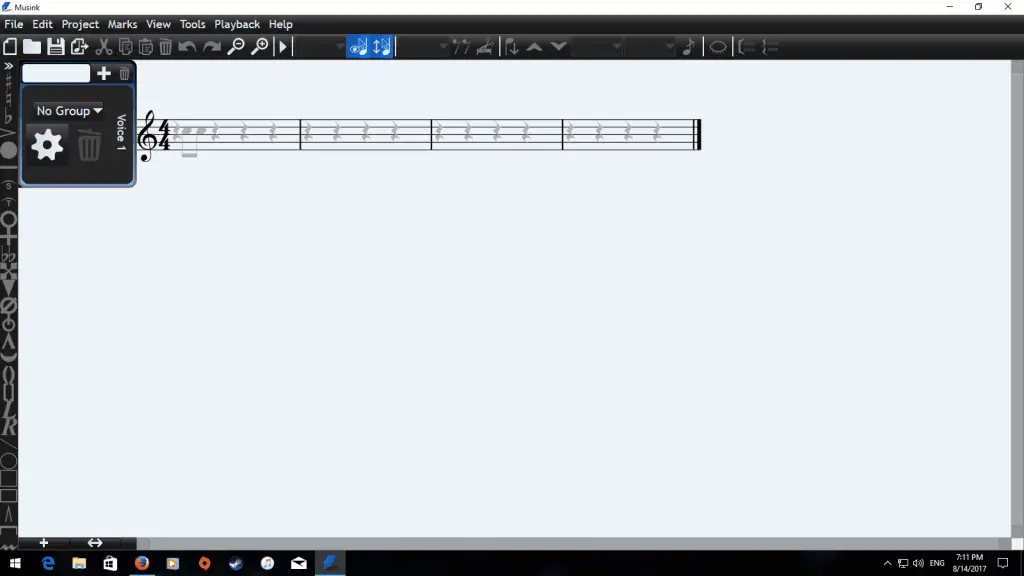
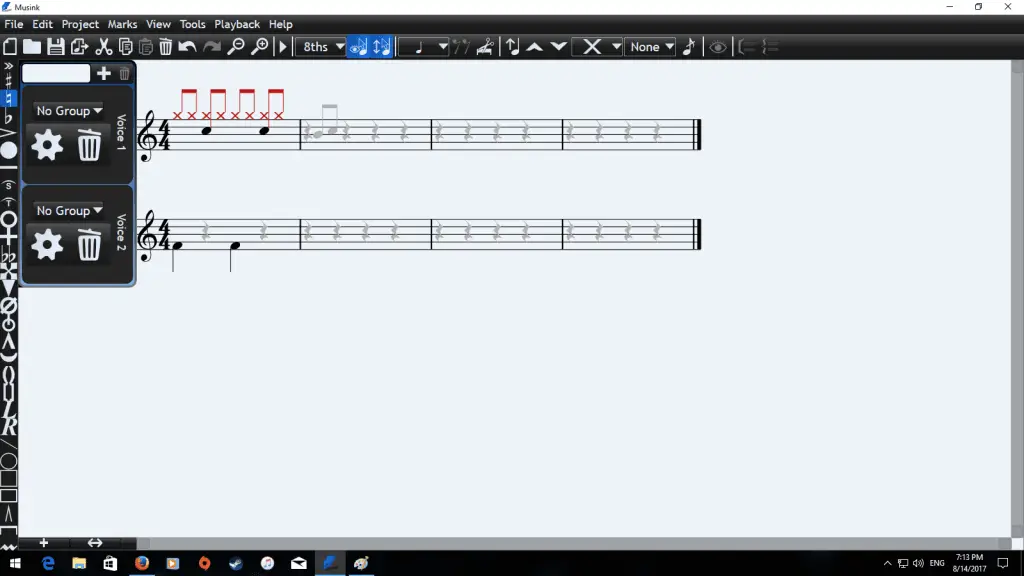
I use a notation program called Musink to write out all my drum parts. And the best part: it’s free and easy to use!
Here are a couple of screenshots so you can see what it looks like:
Also Read: Best Drum Machine

And here is a YouTube tutorial on how to write drum notation in Musink.
That’s it!
I hope you’re now well on your way to reading and writing drum sheet music.